Showing posts with label crafts. Show all posts

Thursday

[crafting] Lamp Shade

I upcycled a lampshade:

DIY Lampshade

I had a laser-cut blue felt table runner that I bought in Quebec City. I think I remember it being rather inexpensive. I took my fabric rotary cutter and cut it according to the height and circumference of the cylindrical shade. I used Elmer's Craft Bond adhesive spray and coated one side of the felt strip and just rolled/attached it around the shade.

DIY Lampshade

I'm so pleased with how this turned it. This project used no new supplies and I finally get to use this brand new lamp that has been sitting around for years (the frame inside was broken- I also fixed that at the same time). I plugged it in in the bedroom.

DIY Lampshade

DIY Lampshade

Not to start hanging up all the misc artwork we have.

Wednesday

[crafting] Map Magnets

I made some map magnets over the weekend:

DIY Magnets

Supplies:

DIY Magnets

Twenty four 1-inch glass cabochons and magnets, JudiKins Diamond Glaze, 1-inch hole punch, glue (I used E6000), map books (or any images you like).

I punched out images I liked:

DIY Magnets

I did try cutting these by hand but using a punch kept the images perfectly round. I will say that I wish the craft store had a 7/8th (or even 15/16th) inch hole punch. The paper just started to show/extend ever so slightly from under the glass on mine.

Take your image:

DIY Magnets

Add a tiny bit of Diamond Glaze:

DIY Magnets

Top with the cabochon, pressing down to evenly to distribute the glaze and get rid of air bubbles:

DIY Magnets

Wait for them to dry and then glue a magnet to the back. DONE.

DIY Magnets

DIY Magnets

I will say I had an embarrassing "Magnets- how do they even work??" moment before gluing them on. Like, is there a right side and a wrong side? A plus side and a minus side like a battery? Am I stupid to be wondering this? I think my confusion stems from magnets attracting and repelling other magnets. I spent an embarrassing amount of time sticking the magnets to things around in the house, to see if one side worked and one side didn't. Spoiler- you can glue either side. 

This was a fast and inexpensive project. Can be personalized, which is nice. I used so little Diamond Glaze for these, I'm prowling the internet for more projects that use this stuff. I also need more ideas for my 1-inch hole punch.

Friday

[crafts] Stitch Markers

I've got a week to wrap up the stitch markers I'm making for the swap at the VT Sheep and Wool Festival. My supplies:


I don't really know what I'm doing but I saw some tutorials online. I'm using some colorful skull beads (looooooove) and some round stone ones that look like little Earth-like planets.

In terms of supplies, I already had a bag of so many plain gold stitch markers that I bought from Knit Picks ages ago- and I think I've only used one or two over the years (I prefer the hard or flexible plastic ones by Clover). I thought they'd be put to better use for this swap, so I bought gold headpins and tiny accent beads and sat down to give it a try. I also already had the jewelry making hand tools. 

Skull:

Skull Stitch Marker

Planet:

Earth(ish) Stitch Markers

They're so cute! I'll work on making up the rest this weekend. And either resist or cave into the temptation to run out to get more beads...

###

TGIF. It's a bit of a doomy-gloomy grey day today. I plan on knitting more on a lace shawl that I started last weekend and watching The First on Hulu. I'm only a few episodes in and it's depressing but good. Tomorrow is officially the first day of Autumn and it definitely feels like it- I have to wear actual socks and shoes when I got out now (so long, flip flops) and I wore a sweater AND scarf to work today. Sigh.

Monday

[crafts] Tulle Wreaths

I managed to finish six wreaths in time for the anniversary party a couple Saturday's ago. They all looked like:


First, I spray-painted the green wire wreath frames silver. I cut 6-inch pieces of blue and silver polka dot tulle and attached them all to the wire frame with slip knots (three concentric circles). Each wreath used about one spool of each. Then I wrapped some silver ribbon about the inside two rings in a zig-zag manner. I found some white beaded decorations (like floral sprays) and attached some strands over the silver ribbon. Lastly I added a strand of wire fairy lights.

All in all they looked pretty nice on the tables. Of course, I didn't want to bring all six home so at the end of the night, I tried getting people to take them home by saying, "If you just add a little red tulle, you'll have a nice red, white and blue wreath for next 4th of July!" I still ended up with three.

It was a good learning experience. The tulle at Joann's is more expensive that the tulle at Michael's ($5 vs. $3) but it's a better fabric (nylon vs. polyester) and is softer with better drape. I needed 12 spools, which could have been expensive but it juuuuust so happened that the tulle at Joanne's was on sale for $3. I lucked out there. If I happen to see the tulle on sale again at Joanns, I might grab a few just to have on hand for a different holiday wreath.

Overall it wasn't a crazy expensive project- the wreath frames were from the dollar store. The silver ribbon and clear bead sprays were from the discount section of the craft stores. The fairy lights were $25 from Amazon (for sixteen ten-foot strands; we used the extras to place around the party ballroom).

Wednesday

[dyeing] Dyeing Yarn with Food Coloring

I've been wanting to try speckle-dyeing yarn with food coloring for a while. I have a couple skeins of natural wool (seconds from the Green Mountain Spinnery) and a box of nice Wilton gel food colors- so I tried it over the weekend.

I gathered my supplies:

Yarn dying with food coloring

Food coloring, yarn, little blue cups to mix the dye, forks to dip into the dye and then onto the yarn.

First I soaked the yarn in water/vinegar:

Yarn dying with food coloring

Then I squeezed most of the water out of the yarn and put it onto cling wrap on a cookie sheet:

Yarn dying with food coloring


I mixed up some food coloring in little plastic cups with about 0.5 oz water. Then I dipped a fork into the colors and touched it to the yarn here and there:

Yarn dying with food coloring


You have to move the skein around, open it up, and turn it over to ensure you're getting even coverage. I think my yarn was still too wet from the soak because the colors really started to bleed and travel along the yarn:

Yarn dying with food coloring


At this point I steamed this skein to set the dye. I put a canning rack into a deep pot with an inch of boiling water and then set a metal colander on top of it. I put the yarn into the colander and steamed for about 10 or 15 minutes while I dyed the other skein. Because of all the jumbled colors on the first attempt, I used only pink, green and brown for the seconds skein.

The finished yarns (rinsed and dried). Skein #1:

Yarn dying with food coloring


Skein #2:

Yarn dying with food coloring


They still kind of bled color a bit when I washed them after steaming. I think I should use them alone for their own projects, in case they still bleed a bit of dye. I like skein #2 better- less is more.

It was a fast and easy experiment. Would be a fun weekend craft project to do with kids. But not really my cup of tea. I had issues with the steaming; at first I tried to just set the yarn on top of the canning rack but pieces kept drooping into the boiling water. It was a while (too long!) before I thought to put a metal colander on top of the canning rack.

Also, the colors ended up muddier than I would have liked. Obviously, like anything, I'm sure I'd get better if I do it a lot more but... I'd rather be knitting with pretty yarn that more skilled professionals create.

[crafts] Mardi Gras decorations

Working on a new wreath for the entryway:

Mardi Gras


I had an unfinished purple, gold, green deco-mesh wreath. I went to the party store and bought a few beads and feather masks. The little jester is a souvenir that a coworker brought home for me from New Orleans about, oh, 12 years ago. It has been in my office ever since but I thought it would add authenticity to the Mardi Gras theme.

Still working on a knit crown. I baked a couple New Orleans King Cakes last night- and brought one into work. There really isn't a way to decorate a King Cake without the result looking like you were drunk and blindfolded. I've accepted it. I think for next Tuesday, I might try to make an French
galette des rois.

Thursday

[crafts] White Deer

A white plastic deer head:

Deer bust


The plan here is to paint it teal and hang a cross-stitched piece under that says "TL; DR". Teal deer. Ahhh hahahahah, how whimsical.

But... I haven't charted out any of the letters yet. I received a lovely sack of yarn from Webs yesterday- which I hardly even touched. I can't do anything until I'm done watching Netflix's Making a Murderer. I just started watching a few days ago and I am completely obsessed with this documentary. Supper has been eggs over easy and toast for two nights. Usually I'm happy to knit on the couch while Dollar plays Fallout next to me- but I've resorted to plugging earbuds into my iPad and continuing to watch the show while I ignore him and the cats. Everyone in the house will be relieved when I finish all the episodes. Hopefully tonight. 

Wednesday

[crafts] Seashell curio tray #2

I made a seashell curio tray as a gift last year. I liked how it turned out so much, I wanted to make another for me. (I'm trying to simultaneously work on non-knitting crafts because all the knitting I'm doing is super secret.) I dumped out all my shells:

Sifting through shells

After much picking/sorting/separating/fiddling, I had a layout that I liked:

Shell curio tray

Just have to hot glue everything down and then it's ready to hang. We've got so, so, so many pictures and items to hang on the walls- I think we're going to have a "hanging party" soon. But we might have to call it something else or at least preface it with "picture-".


Monday

[crafts] Paint your own pottery

Went to paint pottery last week at Tip Top Pottery:

Painting Pottery

Painting Pottery

It was nice and relaxing- plus, you can bring wine!

I might go back this week to make a couple more pieces.

Friday

[crafts] Skull Jack o'lantern

Last year I carved my pumpkin way too early and it was all shriveled up before Halloween. This year, I waited until the week of Halloween. 

Skull Jack o'lantern

The stencil I used is here. I printed it out and taped it to my pumpkin. I opened up one end of a paperclip and poked holes along the pattern, to outline where I would need to cut. Then I used my pumpkin carving tool cut. I accidentally broke off a bit of the skull's jaw on the right, so I had to hold it back in place with a toothpick.

I used a round, tin biscuit cutter (like a donut cutter without the center ring) to clean out the inside of the pumpkin. It was nice and sharp for scraping away all the seeds and gunk on the inside walls. I've used spoons in the past but this biscuit cutter was 100x better.

At night, all lit up:

Skull Jack o'lantern

This was quick- less than an hour to clean and cut. Next year, maybe I'll do two. Or get Dollar to make one as well.

Thursday

[crafts] Silver Spray Paint

During the long weekend, I wanted to do as many crafty things as possible- and hopefully finish up a few projects. I recently bought a can of metallic silver spray paint and went to the thrift store looking for things I could gussy up.

Here's the crap I bought, totaling $12:

Thrift Store items


Mostly vases. A couple ceramic ones, one glass, one terracotta, one bird votive candle holder and a glass dish. I sprayed them all over a few times (upside down, right-side up) with silver and the next day added a couple coats of high gloss sealer. 

The results:

Spray painted a bunch of crap from the thrift store silver. #sofancy

So fancy! The little bird and nest I especially love because of the detail. I love the look of spray painting over plastic animals.

Would definitely do this again. Still want to spray seashells, mason jars, an old candelabra. I've also seen some people use puffy paint to dot a design on the outside of glass bottles- and then spray paint over the entire item.

Wednesday

[crafts] Bottlecap tray

I've made a few bottlecap trays in the past. They're pretty easy to make. I will buy any tray I see somewhere that is deep enough to be a future bottlecap tray. I had a nice black tray and sat down with my bags and bags of bottlecaps (organized by color) to put down a design. After several failed attempts I ended up with:

New bottle cap tray in the works. 108 unique caps. Took way way waaaaaaay too long to get a design I liked. Time to glue them down and stop fiddling with it.

It's 9 x 12 = 108 unique caps. No repeats. I don't know if I should be impressed or worried for our livers. My excuse is that we have been collecting caps for years and try new things all the time.

I fiddled with the placement of a few caps within the columns but this was the overall color change- red orange yellow gold white green blue black.

The finished tray:

Bottlecap Tray

The steps are simple: use a hot glue gun to glue down all the caps. Mix up some grout and press it between all the caps. Use a damp cloth to wipe clean the surface of the caps and make them shiny again. When the grout is dry, mix epoxy resin and pour it over everything. Blow on the surface of the resin to pop bubbles and use a toothpick to pick up errant bits of fur that have settled on the surface. Leave in a shut room overnight. 

Cap/grout close-up

Each tray is a learning experience for me and this time I learned not to scrub the caps so much. This was the largest tray I've done and I didn't have enough grout to do the entire thing at once. I put down what grout I had and using paper towels, I cleaned around each cap. Cleaning, rubbing, essentially exfoliated each cap without realizing that I was scrubbing away the design. I bought more grout and did it all again. I stepped back and wondered why the colors didn't look so vibrant; then I noticed that I was scrubbing it all off! You can see around many of the caps in the close-up picture that the design has been rubbed off around the edge. It's not so bad- it gives it more of a... distressed or antique look but NEXT time I'll make sure I have enough grout and do this step without scrub, scrub, scrubbing away a little of each cap's color.

I love showing this tray to people because they're eyes dart around- reading each cap, recognizing some, wondering what others are. It's a pretty fun functional piece of art. We're keeping this one!

Tuesday

[crafts] Autumn Wreath

I've been making wreaths from vines since I was a kid. I remember spending the summers at my grandparents farm (where I now live) and ripping down vines to make rustic wreaths. Earlier this summer, I saw some vines growing all over the large rock pile we have. I pulled them off, stripped the leaves, sat on the porch and wound them into a simple, plain wreath. It's been hanging up undecorated. This past weekend I bought some fall-themed faux floral decorations at the craft store. Here is my handmade wreath, before adding the decorations on the right:

Homemade vine wreath + Craft store autumn floral decorations =

And after, hanging on the front door:

Autumn wreath. Might submit to fair. Unsure if faux floral decorations allowed.

I would like to enter it into the fair this year but I'm not sure faux-floral things are allowed. I will have to check the book. I don't have a problem with fake flowers or stick my nose up at them- this wreath will last forever and it's weather-proof, which is nice because it's outdoors.

It may seem a tad early to decorate for autumn but I had to take down all the leftover 4th of July decorations and the only sensible replacement seemed to be fall stuff. The entryway table now looks like:

Entryway

I'll probably leave it the same until Thanksgiving. Maybe add a few spooky things for Halloween but only change the entire display for Christmas. ... Yuck! I can't believe I'm talking about Christmas decorations in early August. I'm going take some pictures of flowers and go back to complaining about the awful heat and humidity.

[crafts] Seashell curio tray

I bought a couple bags of miscellaneous seashells from a thrift store and a craft store. I suddenly had 1,000 shells and started perusing Pinterest for craft ways to use them. I saw an old printer's drawer with shells glued in and hung like a work of art. The small spaces for movable type were a perfect fit to showcase different shells. I copied the idea with a curio tray:

Seashell curio tray. Made as a Christmas gift. Good thing I have enough shells left over to make one for me.


Given away for Christmas but thankfully I still have 975 shells leftover and plan on making another for me. The only time consuming part of the project is pawing through all the shells and placing them in compartments just so. Then hot glue-gunning everything down only takes 10 minutes. 

Thursday

[crafts] Faux Succulent Garden

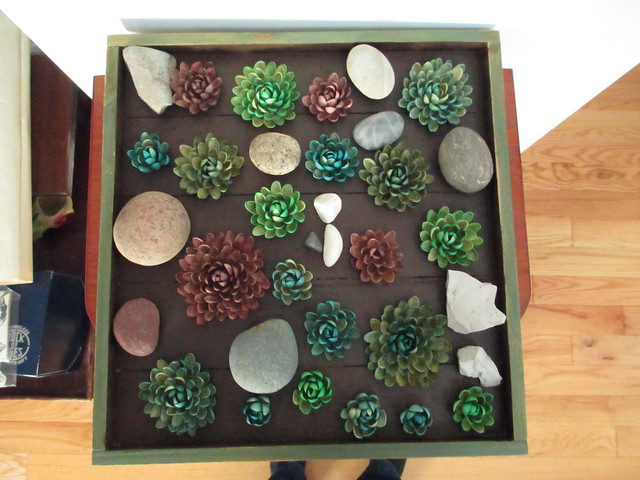
I finally put everything together for my faux succulent garden:

DIY faux #succulent garden. Pistachio shell succulents, misc rocks and bits of moss.

I used a sign that I purchased at the craft store. It had "Apple Orchard" printed on it with a big apple. I painted over it:

Faux succulent rock garden

Then I added the pistachio shell succulents that I made a few weeks ago:

Faux succulent rock garden

Then added rocks:

Faux succulent rock garden

And finally variety of mosses:

Faux succulent rock garden

Very pretty. Possibly good Feng Shui depending on where I have it. Kind of useless and takes up a lot of valuable table space, though. I figure when I'm sick of it, I'll take the rocks back out, toss the moss and shells and repurpose the sign into a bottlecap table.

Wednesday

[crafts] Pistachio Shell Succulents

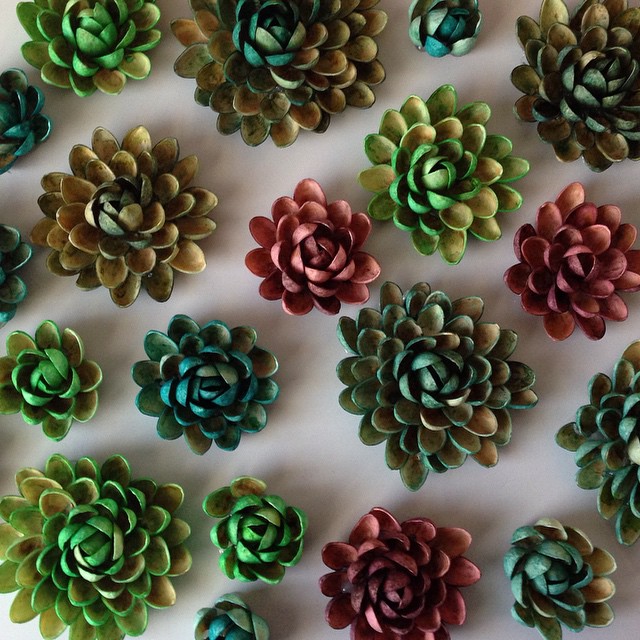
I pinned this hanging succulent garden craft project a long time ago. I thought that the pistachio shells really did look like sempervivium. Using this project as an excuse to buy all the pistachios, I saved shells for a while and finally glued them together last weekend.

Making DIY #succulents. If I never see another pistachio shell again, it will be too soon.

Pretty. Tedious to make but pretty. I glued them together on waxpaper. Once they set, I turned them over and squeezed more hot glue into gaps, just to secure the shells more.

I used food coloring to dye them:

Pistachio shell #succulents dyed with food coloring. They look really realistic.

The crafter of the original project used Rit dye, which seems to have dyed her shells in anywhere from 30 seconds to 5 minutes. Food coloring took way longer- like, 30 minutes in some cases. Being in the dye bath for so long, some of the shells became saturated and fell off from the hard glue bottom. There was a lot of re-gluing I had to do after the fact- to repair the succulents. So, I wouldn't recommend food coloring.

What to do with them now? I would like to find a small table, with a lip/edge, to display these with my rock collection. I have a wooden sign board that is meant to be hung but I could attach legs to each of the four corners and convert it into a small table.


Thursday

[crafts] Clover PomPom Maker

I've tried a few different pompom-making tools but my favorite are the Clover pompom makers. They are easy to use and make nice, fluffy pompoms. For the hats yesterday, I made a pompom for each.

I didn't have that much leftever yarn from knitting the rainbow-colored hat, but was able to fill up either side of the tool:

Clover small pompom maker

Push the curved arms back together:

Clover small pompom maker

Get to cutting:

Clover small pompom maker

Tie a piece of yarn around the middle, cinch, pull apart either side of the pompom maker and poof:

Clover small pompom maker

I like the different sections of color from the striping yarn. I'm tempted to try some other pompom crafts... like hedgehogs, or Adventures in PomPom Land (that bird's pompom head is so stupidly round and perfect), or it's the right time of year for a PomPom o' Lantern, or whatever this thing is, or maybe animals. So many options. I should use all my leftover yarn for pompoms.